61 to 66 to 66 Turn Signal/Brake Light Problems

September 29th, 2015
61-66 Turn Signal Switch

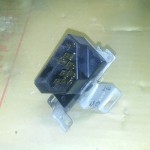
61-66 Turn Signal Switch

Note hook tangs on side

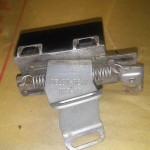
Note hook tangs on side

I get at least two phone calls a week concerning massive problems with 61 to 66 turn signals and/or brake light problems.  It’s like your system went nuts!  And you know what?  It did!  OK, lets solve your problem…..first off, you need to crawl under your dash and find your turn signal switch.  No, it’s not under your steering wheel.  Your turn signal lever just moves a cable that runs down your column to the switch.  It is located about 5/8ths of the way down your column on the top of the tube.  The switch closest to the dash is your neutral safety starter switch and your back up light switch (same switch IF your car is a column shift).  If your car is a floor shift, the only other switch is your turn signal switch.  It has a pyramid shaped plug with a number of wires.  Carefully unplug it.  Now, using a 5/16ths nut driver or ratchet/socket, remove the two sheet metal bolts holding the switch to the tube.  Then, slide the switch up towards the dash off the looped wire (look on the back to see).  It should not be loose in your hand.  Cruise on over to your work bench and notice that there are four fold-up tabs, two on each side of the switch.  CAREFULLY fold these tabs back to separate the switch into two pieces.  NOW you will see your problem….when these switches were assembled, Pontiac used white lithium grease to provide lubrication for the contacts to slide when you moved the turn signal lever.  After 50+ years, these once pliable grease has turned into hard crap, forcing the contacts to go all kinds of wrong places.  Thus your system going nuts!  Get some good electrical contact cleaner and completely clean the inside area of both pieces.  While it’s air drying, trot over to O’Reilly Auto Parts and pick up a small package of di-electric grease (usually up front on the parts counter).  It’s clear and used for electrical connections.  I use it on my snow plow plugs.  Now, take a small pick with a 90 degree bend and carefully pull up on the spring loaded contacts.  You MUST be careful not to pull them too far.  Maybe a 16th of an inch.  Once all are done, now take and wipe a thin film of grease over the contacts, both sides.  DO NOT glob a lot of grease in here.  Carefully re-assemble the switch the same way it came apart.  Fold the four tabs up as these are only good for a couple of times being bent.  Slide the post on the back of the switch back and forth to make sure nothing is binding up.  Re-install the switch on the column making sure the post goes thru the loop on the cable coming out of the column (centered).  Be careful not to over-tighten the two 5/16ths bolts.  Now, plug the harness back in and try your signals and brake lights.  You should be in business.  I have never seen one of these switches fail in service except for the reason above.  Pretty durable.  The same switch was also used on 61 to 66 full size Chevys.  LK  9-22-2018

Minnesota Car Guys Beware!

September 29th, 2015

It should be stated that the following is in my opinion:  Stay away from C & E Auto Upholstery in Savage, MN.  I had my 1964 Blue Catalina 2 door sedan interior install at C & E.  Have never been happy with a number of items…headliner, door panels and other issues.  I provided a decent 64 front seat for the car however the owner, Tom, demanded the seat be sand blasted, power coated and completely redone.  Imagine my surprise when I recently removed the seat after 10 years, to 4 speed my car and found that the wire that runs from one side of the seat to the other to release the seat tracks, was NEVER installed on my seat.  I had to manually release the passengers side of my seat to access the bolts.  I called C & E and asked to speak to Tom (who is always busy on the phone).  I left a message and as usual, no return call.  This wasn’t something that broke or wore out.  This was a complete failure to finish my seat in the first place.  I am still cleaning headliner glue from my interior 10 years now.  My door panels fit like crap (came from SMS in Canby, OR, another flake outfit), my carpet is glued down in some areas where it shouldn’t be and not in areas where it should be.  One more item….I provided a new car set of tar paper to replace the original tar paper in the car.  They did not remove the original tar paper, they just glued the new stuff right over the old stuff.  And let me tell you, they glued the shit out of everything.  WAY TOO MUCH SPRAY GLUE.  It took me 2+ hours just to get my carpet pulled up enough to install my shifter porch.  The more I dig into my interior, the madder I get.  There are a lot of upholstery shops in the Twin Cities.  This is one to stay away from.  Don’t like the workmanship, nor do I like the attitude of the owner.   Once again, this is in my opinion, which I am entitled to under the First Amendment.  Thanks!  LK  9-22-2018

61 to 64 and 65 to 68 Driveshaft Info:

August 28th, 2015

By popular request, here is info on certain driveshafts used in 61 to 64 Catalinas, Grand Prixs, Bonnevilles and Star Chiefs.  Remember that Catalinas and Grand Prixs share the same wheelbase (119″).  Bonneville and Star Chiefs are the same (121″).  These measurements are center of u-joint to center of u-joint on the driveshaft.  On to the info:

Catalina/Grand Prix:

3 and 4 speed:  59 11/16″ length, driveshaft diameter 3 3/16″

Hydramatic:  58 1/8″ length, driveshaft diameter 2 13/16″

Bonneville/Star Chief:

3 and 4 speed:  61 1/2″ length, driveshaft diameter 3 7/16″

(big thanks to Bill Hall for providing this info!)

Hydramatic:  61 1/2″ length, driveshaft diameter 3 1/4″

65 to 68:  All driveshafts, both 4 speed and Turbo 400 Hydramatic are the NOT same length!  And diameters are different.  The automatic driveshaft must be shortened by 1 and 9/16″.    You can always tell the automatic yokes as they are REALLY long.  Too long for a 4 speed.

Here are some pointers….I ALWAYS have my driveshafts balanced when they are out.  I recently found my own 4 speed driveshaft for my Catalina BENT in three place when the shop went to balance it.  They were able to put it on a lathe and turn it straight.  Also, now is the time to change out your u-joints.  About $15 at O’Reilly.  Do not buy the Heavy Duty u-joints there unless you drag race your car.  They are hard to install as well, too big.  Let the driveline shop determine what u-joint is correct for your front yoke.  Sometimes they take an adaptor u-joint depending on your application.  If you are using a period correct 61 to 64 T-10 in your 4 speed car (short or long shaft),you will need to find a 16 spline yoke.  Chevys use the same yoke on the manual transmissions (3 and 4 speed).  Some shops can convert an early T-10 into 27 spline yokes.   Hydramatics use two different yokes depending on if it’s a Roto 200 (SlimJim) or a Roto 275 (Bonnie/Star Chief).  They interchange with nothing.  If you go to a Turbo 350, Turbo 400 or a 200R4, make sure to get the correct yoke for that transmission.  When you car is sitting on the ground with the driveshaft installed, you want about 3/4″ of yoke showing out the back of your transmission.  Any less and you’ll beat the rear seal and bearing out of the transmission when you hit bumps.  I always sandblast my driveshafts before having them worked.  Look closely for cracks on the u-joint mounting eyes, missing or lifting up weights and sub-standard welding.  I DO NOT recommend you cut or lengthen your own driveshaft yourself.  Take it to a quality driveline shop. Fleet Pride in Burnsville, MN is very good.  Hope this helps!  LK  9/22/2018

Some new information on converting to a 4 speed…

January 16th, 2015

Never, and I mean NEVER attempt to put a long shaft Muncie (M20) into a 61 to 64 Bonneville.  These cars were built with a long shaft Borg-Warner T-10. Although the transmissions are close to the same length, they are totally different in two major ways.  #1:  The transmission mount is 10″ too far forward on the Muncie verses the T-10 and will not line up anywhere near your cross member.  #2:  The shifter comes up 1.5″ too far forward and 1″ closer to the center of the transmission hump.  The regular 63-64 Bonneville shifter porch (which we reproduce) will not line up or work with the Muncie.  The long shaft Muncie was used in 65 to 68 full size Pontiacs and Buicks.  BTW, I have now found long shaft T-10’s with one or two mounting blocks on the tailshaft (Bonnies use the rear one) and Muncie long shafts with different mounting block locations as well.  When in doubt, use the original equipment to the car.  Saginaw transmissions have the same basic problem in 61 to 64 Pontiacs as the Muncies.  Therefore, I recommend that you only use the original transmissions to your car.  61 to 64 Catalina and 62 to 64 Grand Prix:  Short shaft T-10.  61 to 64 Bonneville:  Long shaft T-10.  65 to 68 All Full Size Models:  Long shaft Muncie M-20.  These are all somewhat easy to find.

Also, never put a Muncie into a 61-64 Catalina or Grand Prix….same problems as above.  Always use a T-10 in these car for 61 to 64.  The Bonneville T-10 is a real bitch to find.  It is 2″ longer than a regular T-10.  Pontiacs T-10’s always had cast iron cases and aluminum tail shafts.  If your T-10 has a Chevy bowtie, it’s not right! The somewhat good news is that the Hurst Competition Plus shifter is the same between the Muncie and the T-10.  I order mine from Jegs.  The shifter is #391-7308 and the installation kit is either 373-3163 for a Muncie (65 to 68) or 373-4734 for your T-10 Bonnie, Catalina and Grand Prix 61 to 64).  Remember, if you have to move your cross member, your parking brake is SERIOUSLY affected.

Some people think that just because GM stopped using T-10’s in big cars in 1965, that there was some dark reason.  No, GM built and owned Muncie and the decision was made to enter into the 4 speed business in 1964 starting with A body and full size Chevys.  In 65, the Muncie 4 speeds found  themselves in full size Pontiacs and Buicks.  Ford used T-10’s well into the 80’s.  GM also returned to Borg-Warner using Super T-10’s in Camaros and Firebirds.  BTW, here’s a little known fact….Saginaw, which made all of the Pontiac 3 speeds, burned to ground in 1964.  If you had a 65 thru 67 A body or big Pontiac with a 3 speed, it was a Ford Top Loader with a Pontiac bolt pattern at the bellhousing!  Saginaw did not start doing 3 speeds again for Pontiac until 1967!  Great transmissions with a full syncro and a 2:70 first gear!  Many a Pontiac was drag raced using these 3 speeds.

Last but not least is which transmission do you have?  And furthermore, which transmission should you put in your car?  This is based on your rear end.  You need to determine what rear end gears you have.  Here is how to find out:  Jack your car up with the rear wheels off the ground.  Put your car in neutral.  Using chalk, mark your driveshaft and the rear yoke in the same line.  Then mark your right rear tire on the inside spin the tire and count how many times the driveshaft goes around.  2.7 times = 2.69, a little over 3 = 3:08, almost 3.5 times would be 3:42’s…etc.  Rule of thumb…..if you have 3:55 or higher gears (3:23, 3:08…etc), you will want to use a wide ratio 4 speed.  If you have steeper gears (3:70, 3:90’s …etc), you will want to use a close ratio 4 speed.  OK, how do I tell what transmission you have?  Click it into first gear.  First gear is the rear lever on the side cover. You will click the post to the rear to get into 1st gear.  Use a Cresent wrench. Then, spin the rear shaft over one complete time counting how many times the front shaft turns Chalk is go here too.  2:20 times is a close ratio.  2:54 times is a wide ratio.  Same for either T-10’s or Muncies.  If you use a close ratio with highway gears, your car will fall flat on its face when you let the clutch out.  Same way in reverse using a wide ratio with steep gears.  It will be like driving grandpa’s old pickup starting out in granny 1st gear.

In closing, there are a lot of issues to address when converting your 61 to 68 full size Pontiac to a stick.  I am still learning more everyday. Hope this helps!  LK  9-22-2018

PS:  I am still working on the stick conversion papers I spoke of earlier this past year.  Please hang in there!

Finally… a place to get your fuel sender repaired!

January 16th, 2015

After YEARS of searching, a really great guy in California named Tom has shared a name and number of a place to repair your fuel tank sender.  Sure, we sell reproduction senders for 61 to 64 Pontiacs but what if you have a wagon or say a 65 thru 68?  No repros exist and they are hard to find and can be pricey IF you find a NOS one.  Well, get ahold of a company called Tri-Starr, LLC, 1452 State Route 89, Seneca Falls, NY, 13148.  Email is sendingunitguy@gmail.com.  Their phone number is 315-712-0071.  Repair costs range from $75 to $125.  Speak to Dan. Big thanks to Tom for helping everybody out.  Would like to hear from anybody using this company afterwards.  LK 9-22-2018

The Scoop on 61 -62 “Forged” Rods

January 7th, 2015

Let’s cut to the chase on the “so called” Pontiac factory forged rods. First off, Pontiac has only made REAL forged rods for three engines.  The 69 Ram Air IV, the 73 and the 74 Trans Am Super Duty 455’s.  At no other time in Pontiac history did they ever make a TRUE forged rod. Remember that all Pontiac rods from at least 61 on up are the same size.  326 to 455 basically use the same rod as they are all the same size. Pontiac did make an almost “forged” rod in 61 and 62.  The rods heat treated but NOT annealed.  People on eBay are selling these as forged rods.  They are not, however they can be.

First off, you will need to find a heat treating place.  The rods will need to be heat treated and then annealed.  THEN the rods will need to be resized as they will not be the same size before this process.  Do I know the correct hardness that the rods will need to be?  No.  If you know, please let me know so I can add the information here for others.  I am just trying to get the info out there so people stop getting screwed on eBay or pass around incorrect information.  BTW, NEVER reuse any rod bolts.  Always replace these when rebuilding your engine.  ARP makes new rod bolts cheap.  So unless you’re going past 6,500 rpms, the factory rods will do the trick.  Hope this helps!  LK  9-22-2018

WANTED: 63 and 64 Bellhousings + driveshafts!

November 5th, 2014

Because of recent bunch of 4 speed conversions, we are running short of 63 and 64 bellhousings.  Here is what we are looking for:  63:  Part number 9770091, you can always tell a 63 from a 64 as the upper 6 bolt holes on the 63 take  7/16″ bolts however 64’s take a 3/8″ bolt.  64’s are 9773762-1, 9773762-2 or 9776383.  As with all cast iron bellhousings, we sandblast them and then magnaflux to reveal any cracks.  They would be returned to you if found to be cracked.  Please, no bellhousings that have been welded on either. Sorry.  DO NOT WELD ON OR REPAIR CRACKED CAST IRON BELLHOUSINGS. Not interested in the $450 crap on eBay.  Also looking for 61-64 3 or 4 speed manual driveshafts.  No Slim Jim or Hydramatic driveshafts.  Also need a bottom cover for a 61-62 Ansen NHRA scattershield. Have other 63-64 new and used clutch parts and other parts to trade or will consider cash.   Thanks!  LK 9-22-2018

1963 1964 Firewall Foam Steering Column Seal

October 30th, 2014

Our newest repro part!  This is the seal that goes under the plates at the base of your steering column.  It is usually rotted, stinky, filthy and not reuse-able.  It goes around your steering column and your clutch rod if you have a stick car.  A sorely needed item in the world of big cars!  Your choice of either stick or automatic (console of column shift the same).  Price is $10.95 plus $8.50 USPS Priority in the US.  World-wide at cost.  Order now!  LK 9/22/2018

Les Kasten accepts POCI 8 Lug Tech Advisor post…..

July 26th, 2014

Les Kasten has accepted the Pontiac-Oakland Club International invitation to become their advisor on 8 Lug wheel issues.  The post was previously held by longtime POCI member Ron Panzer who recently passed away.  Ron and Les shared much information on the subject of 8 lug wheels.  Ron had written four articles for Smoke Signals regarding the 8 lugs, which opened a lot of peoples eyes to the world of 8 lug wheels and the differences and variations known.  Les considers this to be an honor and hopes he can help those who need information.  Thank you to the POCI for choosing me.  I hope I can help but I know I can never fill Ron’s shoes.  LK 9-22-2018

Looking for that special clip or fastener?

June 23rd, 2014

How many times have we needed to find a special clip or fastener on our cars?  Especially when it came time to re-install our moldings.  Of course, your local paerts store has nothing but plastic push on speed clips and the like.  Well, I have some good news for you.  I knew of this company a few years ago but never thought to put anything out here.  I ran into Mark this weekend at the Back to the 50’s swap meet in St. Paul, MN.  What a layout of stuff!  Plus Mark says he has a lot more that he doesn’t bring to the swap meet including a bunch of old clips.  Please give him a try at Scorpion Supply, 715-284-7717 or email him at mark555@centurytel.net  You may need to email a photo of what you need and it’s best to lay the clip you need on a ruler or tape measure and then photo it.  You will be amazed at what he has.  LK  9-22-2018